

Limescale and Burnt Stains on Pans? Here’s How to Remove Them Without Ruining Your Cookware
A favorite pan can look completely ruined after months or years of cooking. The bottom may become covered with brown grease, black burnt-on residue, cloudy white mineral deposits, or a combination of all three.
Before throwing it away, there are several simple cleaning methods worth trying.
The key is knowing what kind of stain you’re dealing with and what material your pan is made from. A method that’s perfectly reasonable for stainless steel may damage nonstick coating, aluminum, copper, or enameled cookware.
And despite what viral cleaning photos sometimes suggest, there isn’t one magic white powder that safely restores every type of pan.
Here’s how to clean stubborn pan stains without unnecessarily damaging your cookware.
First: Is It Limescale, Burnt Grease, or Both?
Not every white or brown mark on cookware is the same.
Limescale or mineral deposits usually appear as chalky white, gray, or cloudy patches. They’re commonly left behind when hard water evaporates and minerals remain on the surface.
Burnt-on grease tends to be brown, amber, or black. It develops when oils and food residues are repeatedly heated onto the cookware.
A pan may have both at the same time.
Identifying the problem matters because acidic cleaners can work well on mineral deposits, while greasy carbonized residue often needs detergent, soaking, or gentle mechanical cleaning.
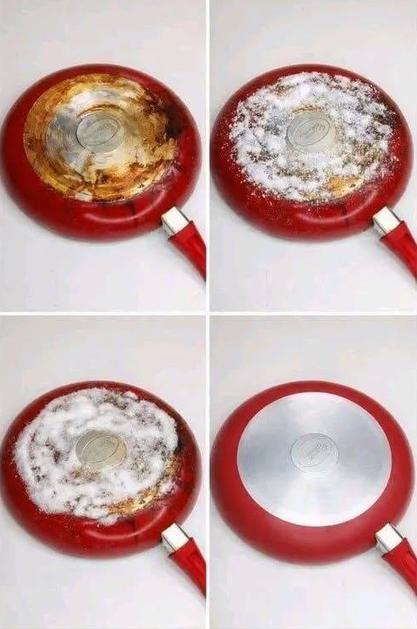
Method 1: Baking Soda Paste for Burnt-On Residue
Baking soda is one of the most popular household pan cleaners because it provides mild abrasive action.
For compatible cookware, start by making a simple paste.
What You’ll Need
- Baking soda
- Warm water
- Soft sponge or non-scratch cleaning pad
- Dish soap
- Soft cloth
Instructions
Allow the pan to cool completely.
Wash away loose grease and food using warm water and dish soap.
Sprinkle baking soda generously over the stained area.
Add just enough water to create a thick paste.
Spread it across the residue and leave it for approximately 15–30 minutes.
Then gently scrub with a soft sponge or non-scratch pad.
Rinse thoroughly and wash the pan normally afterward.
For stubborn buildup, you may need to repeat the process rather than using increasingly aggressive force.
Why Baking Soda Can Help
Baking soda doesn’t magically dissolve years of carbonized grease.
Its usefulness comes largely from its gentle abrasive action, which can help loosen surface deposits when combined with water and physical cleaning.
That’s also why you shouldn’t assume it’s appropriate for every polished or coated surface.
Always check the cookware manufacturer’s care instructions first.
Method 2: Vinegar for White Mineral Deposits
If the problem is primarily white, chalky mineral buildup, an acidic solution may work better.
White vinegar contains acetic acid, which can help dissolve certain mineral deposits.
For compatible cookware, dilute white vinegar with water and apply it to the mineral-stained area.
Allow brief contact, then wipe or gently scrub before rinsing thoroughly.
If you’re cleaning the inside of an appropriate stainless-steel pan, a diluted vinegar solution can sometimes be warmed briefly to help loosen stubborn mineral residue.
Wash thoroughly with dish soap afterward.
Important Warning
Vinegar isn’t safe for every material.
Acids can react with or damage some surfaces, particularly certain aluminum finishes, natural stone countertops nearby, or specialty cookware.
Don’t automatically pour vinegar over a pan just because a viral cleaning post recommends it.
Check the manufacturer’s instructions.
Method 3: Dish Soap and Hot Water for Greasy Buildup
Sometimes the simplest solution should come first.
Dish detergent is specifically formulated to deal with grease.
If the residue isn’t severely carbonized, fill or soak the appropriate area with hot—not dangerously boiling—soapy water.
Allow the grease to soften.
Then clean it with a non-scratch sponge.
This may take longer than a dramatic internet hack, but it’s often much gentler on cookware.
For the exterior of a pan, a concentrated dish-soap solution can also help soften oily residue before additional cleaning.
Method 4: Baking Soda and Dish Soap
For greasy exterior stains, you can combine baking soda with a small amount of dishwashing liquid.
Mix enough to create a spreadable paste.
Apply it to the stained area, leave it briefly, and gently work it with a soft sponge.
Dish detergent helps attack grease while baking soda provides some mild scrubbing action.
Rinse extremely well afterward.
Again, this should only be used on cookware whose finish can tolerate mild abrasion.
What About Mixing Baking Soda and Vinegar?
You’ve probably seen videos where someone covers a pan with baking soda and then pours vinegar over it.
The mixture immediately starts fizzing.
It certainly looks impressive.
But the dramatic bubbles don’t necessarily mean you’ve created a more powerful cleaner.
Baking soda is alkaline while vinegar is acidic. When mixed, they react with each other, producing carbon dioxide gas—the fizz you see.
The mechanical bubbling may help loosen some debris, but the two ingredients also partially neutralize one another.
For many cleaning jobs, it’s more useful to choose the ingredient suited to the problem:
Baking soda for gentle abrasive cleaning.
Vinegar for compatible mineral deposits.
You don’t need a miniature volcano on your pan.
How to Clean the Bottom of a Stainless-Steel Pan
Stainless steel is generally more tolerant of cleaning than delicate nonstick surfaces, although polished finishes can still scratch.
Start with warm water and dish soap.
If grease remains, try a baking-soda paste and non-scratch sponge.
For mineral deposits, diluted vinegar may be appropriate.
If you’re using a commercial stainless-steel cookware cleaner, follow its instructions carefully.
Always scrub in a way that minimizes scratching, particularly on polished surfaces.
And avoid steel wool unless the cookware manufacturer specifically permits it.
How to Clean a Nonstick Pan
This is where you need considerably more caution.
Nonstick cookware should not be treated like bare stainless steel.
Avoid aggressive scouring pads, steel wool, metal scrapers, and harsh abrasive powders that could scratch or damage the coating.
Start with warm water, ordinary dish soap, and a soft sponge.
For stubborn residue, follow the manufacturer’s cleaning instructions for that specific coating.
If food has become permanently stuck because the nonstick surface is badly scratched, peeling, flaking, or otherwise deteriorating, aggressive cleaning won’t restore the original coating.
Replacement may be more appropriate.
Never Attack Nonstick Coating With a Metal Scraper
A metal knife, fork, scraper, or steel-wool pad may remove burnt residue quickly—but it can also permanently scratch the coating.
Once a nonstick surface has been significantly damaged, you can’t restore it with a cleaning hack.
Use wooden, silicone, plastic, or other manufacturer-approved utensils when cooking and cleaning.
What About Aluminum Pans?
Aluminum requires special attention because it can react with acidic and alkaline substances.
Uncoated aluminum can also discolor during cleaning.
That doesn’t necessarily mean the cookware is unsafe, but an aggressive DIY mixture may alter its appearance.
If your pan has an aluminum base with another cooking surface, follow the manufacturer’s instructions for that specific construction.
Don’t assume that because the underside looks metallic, it should be cleaned exactly like stainless steel.
How to Clean Enameled Cookware
Enameled cookware has a glass-like coating that should be protected from scratching and thermal shock.
Avoid attacking stubborn stains with steel wool or other highly abrasive tools.
Soaking with warm soapy water followed by gentle cleaning is usually the appropriate starting point.
For stubborn discoloration, use only methods recommended by the manufacturer.
Chipped enamel is a different issue from staining and shouldn’t simply be scrubbed harder.
Be Careful With Copper
Copper cookware can develop tarnish and discoloration that looks very different from burnt grease.
Copper also requires material-specific cleaning methods.
If you own expensive copper cookware, don’t experiment with random viral mixtures before checking the manufacturer’s care recommendations.
A product designed specifically for copper may be more appropriate than an improvised abrasive.
Why Does the Bottom of a Pan Turn Brown?
Brown discoloration on the exterior usually develops because of heat and grease.
Small amounts of cooking oil can run down the sides or remain on the base.
When the pan is repeatedly heated, those residues can polymerize and eventually form a hard brown coating.
The longer they’re repeatedly heated, the harder they become to remove.
That’s why cleaning the exterior periodically is much easier than waiting until years of buildup have accumulated.
Why Do Pans Develop Rainbow Stains?
Stainless-steel cookware sometimes develops a blue, purple, bronze, or rainbow-colored film after heating.
This isn’t necessarily burnt food.
Heat can alter the appearance of the thin oxide layer on stainless steel, producing rainbow-like discoloration.
It may look dramatic while having little effect on the pan’s cooking performance.
If the manufacturer permits it, a small amount of diluted vinegar can often help with this type of discoloration.
What Causes White Spots Inside a Pan?
If white or cloudy marks remain after washing, hard-water minerals are a likely explanation.
Calcium and magnesium compounds can remain after water evaporates.
That’s why these deposits are especially common in areas with hard water.
Drying cookware after washing rather than allowing droplets to evaporate naturally may help reduce recurring mineral marks.
Don’t Use Oven Cleaner Unless the Manufacturer Says You Can
When the underside of a pan is heavily carbonized, oven cleaner may seem like an obvious shortcut.
But these products can contain very strong chemicals.
They can damage certain metals, finishes, coatings, painted exteriors, or handles.
Unless your cookware manufacturer explicitly says a particular oven-cleaning product is suitable, don’t assume it is safe.
Avoid Chlorine Bleach for Routine Pan Cleaning
Bleach isn’t necessary for removing ordinary limescale or carbonized cooking grease.
It can also react with metals and other cleaning chemicals.
Most importantly:
Never mix chlorine bleach with vinegar or other acids.
Doing so can release dangerous chlorine gas.
Also never mix bleach with ammonia-containing cleaners.
A cleaner doesn’t become stronger just because you combine it with another cleaner.
Sometimes it becomes dangerous instead.
Don’t Pour Cold Water Into a Screaming-Hot Pan
When food burns, your instinct may be to carry the hot pan directly to the sink and run cold water over it.
Avoid extreme temperature changes.
Thermal shock can warp certain pans and potentially damage some cookware materials.
Allow the pan to cool sufficiently before washing it.
How to Deal With Extremely Burnt Food Inside a Pan
If food has burned onto the inside of a compatible stainless-steel pan, don’t immediately attack it with a knife.
Let the pan cool.
Add warm water and dish detergent and allow it to soak.
For compatible cookware, gently heating water in the pan can sometimes help soften stubborn cooked-on food.
Once the residue has softened, use a wooden or silicone utensil to loosen it.
Follow with ordinary washing and, if appropriate, a mild baking-soda treatment.
Repeating a gentle treatment is usually better than permanently scratching the cooking surface.
The 30-Minute Cleaning Routine
If your pan looks like the dramatic “before” photos commonly shared online, try this conservative approach first.
Step 1: Allow the cookware to cool completely.
Step 2: Wash away loose grease using dish soap and warm water.
Step 3: Identify whether the remaining marks are primarily greasy/burnt or white/mineral.
Step 4: For compatible surfaces with greasy buildup, apply a baking-soda paste.
Step 5: Leave it for approximately 15–30 minutes.
Step 6: Gently scrub using a non-scratch sponge.
Step 7: Rinse and inspect.
Step 8: If compatible mineral residue remains, treat that separately with diluted vinegar.
Step 9: Wash thoroughly with dish soap.
Step 10: Dry the cookware completely.
If the first attempt doesn’t remove years of buildup, repeat it.
Patience is cheaper than a new pan.
How to Prevent Burnt Stains From Returning
Cleaning becomes much easier when stains aren’t repeatedly baked onto the cookware.
Wipe oil from the exterior before placing a pan over heat.
Avoid using unnecessarily high temperatures, especially with nonstick cookware.
Clean splattered grease from the exterior after cooking once the pan has cooled.
Don’t allow food residue to remain on cookware for days.
Dry pans after washing if hard-water spots are common.
And use the heat level appropriate for your cookware and recipe.
When Should You Replace a Pan Instead of Cleaning It?
Not every damaged pan should be rescued.
Consider replacement if the pan is badly warped and no longer sits safely on the cooking surface, the handle is dangerously loose and cannot be properly repaired, or the cooking surface has significant structural damage.
For nonstick cookware, deep scratches, extensive peeling, or serious deterioration of the coating are more important than cosmetic stains on the bottom.
A dark exterior doesn’t necessarily make a pan unusable.
Structural or cooking-surface damage is a different matter.
Frequently Asked Questions
Can baking soda remove burnt stains from pans?
It can help loosen some burnt-on residue because it provides mild abrasive cleaning action. Results depend on the severity of the buildup and the cookware material.
Can vinegar remove limescale from pans?
Diluted white vinegar can help dissolve certain mineral deposits on compatible cookware because it is acidic. Always check whether your cookware material tolerates acids.
Should I mix vinegar and baking soda?
It’s usually unnecessary. The ingredients react and partially neutralize one another. Using each separately for the job it does best is often more useful.
Can I use steel wool on a pan?
Not universally. Steel wool can severely scratch nonstick, polished, enameled, and other delicate surfaces. Only use abrasive tools if the cookware manufacturer specifically permits them.
Why is my pan brown underneath?
Repeatedly heated grease and oil can create hard brown or black deposits on the exterior.
Are white marks on stainless steel dangerous?
White cloudy deposits are often mineral residue from hard water rather than damage to the pan. They can frequently be removed with an appropriate acidic cleaner such as diluted vinegar.
Can I use lemon instead of vinegar?
Lemon juice also contains acid and may help with certain mineral deposits, but the same material-compatibility precautions apply.
Why does my stainless-steel pan look rainbow-colored?
Heat-related discoloration of the stainless-steel surface can produce blue, purple, or rainbow tones. It isn’t necessarily permanent damage.
Will baking soda scratch nonstick cookware?
Abrasive cleaning can damage some nonstick surfaces. Don’t assume baking soda is appropriate simply because it’s a household ingredient. Follow the manufacturer’s cleaning recommendations.
Can I clean the outside of a pan differently from the inside?
Yes. Many pans use different materials or finishes on different surfaces. A method appropriate for an exposed stainless-steel base may not be appropriate for the coated cooking surface.
Final Thoughts
A pan covered in brown stains, white mineral buildup, or burnt grease may look ready for the trash, but cosmetic discoloration doesn’t necessarily mean the cookware is ruined.
Start with the gentlest solution.
Use dish soap and warm water for ordinary grease, consider a baking-soda paste for compatible surfaces with stubborn cooked-on residue, and use diluted vinegar for compatible cookware affected by mineral deposits.
Most importantly, identify the cookware material before copying a viral cleaning hack.
Stainless steel, aluminum, copper, enamel, and nonstick coatings don’t respond identically to acids, abrasives, or strong cleaning chemicals.
And remember: never mix random household cleaners in an attempt to make them “stronger”—particularly chlorine bleach with vinegar, acids, or ammonia.
Sometimes restoring a pan takes a little patience rather than a miracle ingredient.